
MySQL InnoDB Cluster has proven with the first GA release its potential as the native out-of-the-box HA solution for MySQL. With the second GA release, usability, stability and flexibility were greatly improved as described in the previous blog post.
This tutorial aims to show how does a typical InnoDB cluster setup look like and how that setup even became simpler and more effective as before. It’s a great starting point for those not familiar with InnoDB cluster and shall help you to get started.
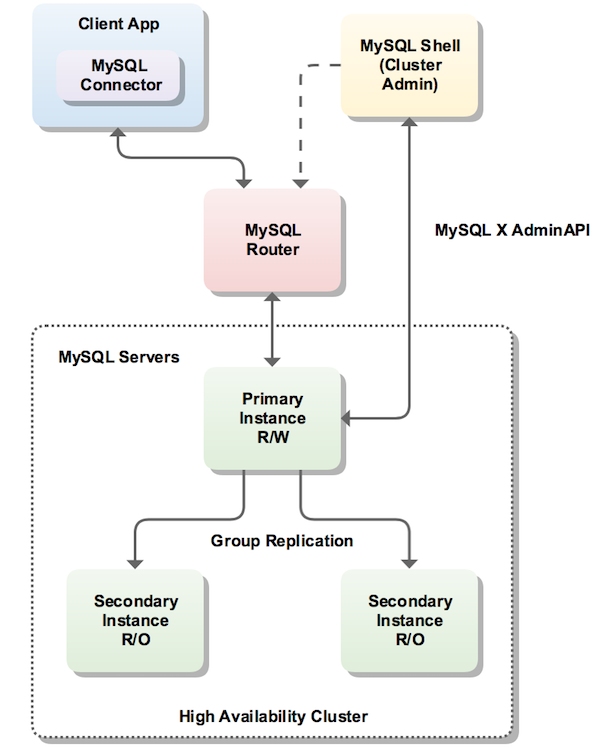
For that purpose, we will use the new MySQL Shell to manage 3 MySQL Server instances and create a 3 member InnoDB cluster (running Group Replication). Then we will set up the new MySQL Router as to hide the multiple MySQL instances behind a single TCP port. Client applications can then connect to the ports MySQL Router provides, without any need to be aware of the InnoDB cluster topology. In the event of an unexpected failure, the InnoDB cluster adjusts itself automatically and MySQL Router detects the change. This removes the need for your client application to handle failover.
Below a typical InnoDB cluster setup:
Downloading and Installing Required Packages
In addition to MySQL Server 8.0.11 GA, you will need to download the two other components of MySQL InnoDB Cluster:
Download and install the packages, through the usual platform-specific methods:
Prepare the instances for InnoDB cluster
You need a minimum of three instances of MySQL in the cluster to make it tolerant to the failure of one instance (Group Replication fault-tolerance). Adding further instances increases the tolerance to the failure of an instance, but for this tutorial, we’ll use three instances only.
We’ll start by assuming that you have three instances running in different hosts, so the next step is to prepare your instances for InnoDB cluster. Before moving to the auto-configuration of the instances you may want to check whether your instances are already ready for InnoDB cluster usage or not.
Note: For testing purposes only, sandbox deployment is available on the Shell. Sandbox deployment can be done using
dba.deploySandboxInstance().Example:
dba.deploySandboxInstance(3306);
Start MySQL Shell (as your ordinary, non-root OS user):
$ mysqlsh
MySQL Shell 8.0.11

Copyright (c) 2016, 2018, Oracle and/or its affiliates. All rights reserved.

Oracle is a registered trademark of Oracle Corporation and/or its
affiliates. Other names may be trademarks of their respective
owners.

Type '\help' or '\?' for help; '\quit' to exit.

mysql-js>
And then use:
mysql-js> dba.checkInstanceConfiguration()The argument to checkInstanceConfiguration() is the connection data to a MySQL Server instance. The connection data may be specified in the following formats:
- A URI string
- A dictionary with the connection options
We’ll use the URI string for this example.
mysql-js> dba.checkInstanceConfiguration("root@ic-1:3306")
Please provide the password for 'root@ic-1:3306': ***
Validating MySQL instance at ic-1:3306 for use in an InnoDB cluster...

This instance reports its own address as ic-1
Clients and other cluster members will communicate with it through this address by default. If this is not correct, the report_host MySQL system variable should be changed.

Checking whether existing tables comply with Group Replication requirements...
No incompatible tables detected

Checking instance configuration...

Some configuration options need to be fixed:
+--------------------------+---------------+----------------+--------------------------------------------------+
| Variable                 | Current Value | Required Value | Note                                             |
+--------------------------+---------------+----------------+--------------------------------------------------+
| binlog_checksum          | CRC32         | NONE           | Update the server variable                       |
| enforce_gtid_consistency | OFF           | ON             | Update read-only variable and restart the server |
| gtid_mode                | OFF           | ON             | Update read-only variable and restart the server |
| server_id                | 1             |                | Update read-only variable and restart the server |
+--------------------------+---------------+----------------+--------------------------------------------------+

Please use the dba.configureInstance() command to repair these issues.

{
    "config_errors": [
        {
            "action": "server_update",
            "current": "CRC32",
            "option": "binlog_checksum",
            "required": "NONE"
        },
        {
            "action": "restart",
            "current": "OFF",
            "option": "enforce_gtid_consistency",
            "required": "ON"
        },
        {
            "action": "restart",
            "current": "OFF",
            "option": "gtid_mode",
            "required": "ON"
        },
        {
            "action": "restart",
            "current": "1",
            "option": "server_id",
            "required": ""
        }
    ],
    "errors": [],
    "status": "error"
}
The command reports that the instance is not ready for InnoDB cluster usage since some settings are not valid.
The AdminAPI provides a command to automatically and remotely configure an instance for InnoDB cluster usage: dba.configureInstance(). So the next step is to use dba.configureInstance() on each target instance.
mysql-js> dba.configureInstance("root@ic-1:3306")
Please provide the password for 'root@ic-1:3306': ***
Configuring MySQL instance at ic-1:3306 for use in an InnoDB cluster...

This instance reports its own address as ic-1
Clients and other cluster members will communicate with it through this address by default. If this is not correct, the report_host MySQL system variable should be changed.

Some configuration options need to be fixed:
+--------------------------+---------------+----------------+--------------------------------------------------+
| Variable                 | Current Value | Required Value | Note                                             |
+--------------------------+---------------+----------------+--------------------------------------------------+
| binlog_checksum          | CRC32         | NONE           | Update the server variable                       |
| enforce_gtid_consistency | OFF           | ON             | Update read-only variable and restart the server |
| gtid_mode                | OFF           | ON             | Update read-only variable and restart the server |
| server_id                | 1             |     | Update read-only variable and restart the server |
+--------------------------+---------------+----------------+--------------------------------------------------+

Do you want to perform the required configuration changes? [y/n]: y
Do you want to restart the instance after configuring it? [y/n]: y
Configuring instance...
The instance 'ic-1:3306' was configured for cluster usage.
Restarting MySQL...
MySQL server at ic-1:3306 was restarted.
The instance is now ready to be used in an InnoDB cluster!
Note:
dba.configureInstance()does not need to be executed locally on the target instance. It can be executed remotely and supports remote restart of the target instance (if required).
Repeat the steps above on all the instances before initializing your cluster.
Note: The user account used to administer an instance does not have to be the root account, however it needs to be an account with a specific set of priveliges for InnoDB cluster management. The preferred method to create users to administer the cluster is using the
clusterAdminoption with thedba.configureInstance().Example:
dba.configureInstance("root@ic-1:3306", {clusterAdmin: "myAdmin", clusterAdminPassword: "myAdminPwd"};
Initializing the InnoDB Cluster
Next, we connect the Shell to one of the instances we just configured, which will be the seed instance. The seed instance is the one that would hold the initial state of the database, which will be replicated to the other instances as they’re added to the cluster.
shell.connect("root@ic-1:3306")
Please provide the password for 'root@ic-1:3306': ***
Creating a session to 'root@ic-1:3306'
Fetching schema names for autocompletion... Press ^C to stop.
Closing old connection...
Your MySQL connection id is 20
Server version: 8.0.11 MySQL Community Server - GPL
No default schema selected; type \use <schema> to set one.
<ClassicSession:root@ic-1:3306>
Next, create the InnoDB cluster:
mysql-js> cluster = dba.createCluster("myCluster");
A new InnoDB cluster will be created on instance 'root@ic-1:3306'.

Validating instance at ic-1:3306...

This instance reports its own address as ic-1

Instance configuration is suitable.
Creating InnoDB cluster 'myCluster' on 'root@ic-1:3306'...
Adding Seed Instance...

Cluster successfully created. Use Cluster.addInstance() to add MySQL instances.
At least 3 instances are needed for the cluster to be able to withstand up to
one server failure.
The createCluster() command takes one parameter, which is a symbolic name you give to this InnoDB cluster. This will, among other things:
- Deploy the metadata schema in that instance (
mysql_innodb_cluster_metadata) - Verify that its configuration is correct for Group Replication
- Register it as the seed instance of the new cluster
- Create necessary internal accounts, such as the replication user account
- Start Group Replication
Add Instances to InnoDB Cluster
Now, you need to add replicas to the InnoDB cluster. Often, when a new instance is added to a replica set in a cluster, they will be behind the rest of the ONLINE members and need to catch up to the current state of the seed instance. If the amount of pre-existing data in the seed instance is very large, you may want to clone it or copy that data through a fast method beforehand. Otherwise, Group Replication will perform a sync automatically (this step is called recovery), re-executing all transactions from the seed, as long as they’re in the MySQL binary log. Since the seed instance in this example has little to no data (ie. just the metadata schema and internal accounts) and have binary logging enabled from the beginning, there’s very little that new replicas need to catch up with. Any transactions that were executed in the seed instance will be re-executed in each added replica.
Add two blank instances to the InnoDB cluster:
mysql-js> cluster.addInstance("root@ic-2:3306");
A new instance will be added to the InnoDB cluster. Depending on the amount of
data on the cluster this might take from a few seconds to several hours.

Please provide the password for 'root@ic-2:3306': ***
Adding instance to the cluster ...

Validating instance at ic-2:3306...

This instance reports its own address as ic-2

Instance configuration is suitable.
The instance 'root@ic-2:3306' was successfully added to the cluster.

mysql-js> cluster.addInstance("root@ic-3:3306");
A new instance will be added to the InnoDB cluster. Depending on the amount of
data on the cluster this might take from a few seconds to several hours.

Please provide the password for 'root@ic-3:3306': ***
Adding instance to the cluster ...

Validating instance at ic-3:3306...

This instance reports its own address as ic-3

Instance configuration is suitable.
The instance 'root@ic-3:3306' was successfully added to the cluster.
And now, we check the current status of the cluster:
mysql-js> cluster.status();
{
    "clusterName": "myCluster",
    "defaultReplicaSet": {
        "name": "default",
        "primary": "ic-1:3306",
        "ssl": "REQUIRED",
        "status": "OK",
        "statusText": "Cluster is ONLINE and can tolerate up to ONE failure.",
        "topology": {
            "ic-1:3306": {
                "address": "ic-1:3306",
                "mode": "R/W",
                "readReplicas": {},
                "role": "HA",
                "status": "ONLINE"
            },
            "ic-2:3306": {
                "address": "ic-2:3306",
                "mode": "R/O",
                "readReplicas": {},
                "role": "HA",
                "status": "ONLINE"
            },
            "ic-3:3306": {
                "address": "ic-3:3306",
                "mode": "R/O",
                "readReplicas": {},
                "role": "HA",
                "status": "ONLINE"
            }
        }
    },
    "groupInformationSourceMember": "mysql://root@ic-1:3306"
}
This command queries the current status of the InnoDB cluster and produces a report. The status field for each instance should show either ONLINE or RECOVERING. RECOVERING means that the instance is receiving updates from the seed instance and should eventually switch to ONLINE.
Another point to note is that one of the instances (the PRIMARY) is marked R/W (read/writable), while the other two are marked R/O (read only). Only the instance marked R/W can execute transactions that update the database. If that instance becomes unreachable for any reason (like a system crash), one of the remaining two instances automatically takes over its place and becomes the new PRIMARY.
Deploy MySQL Router
In order for applications to handle failover, they need to be aware of the topology of the InnoDB cluster. They also need to know, at any time, which of the instances is the PRIMARY. While it’s possible for applications to implement that logic by themselves, MySQL Router can do that for you, with minimal work and no code changes in applications.
The recommended deployment of MySQL Router is on the same host as the application. During bootstrap, MySQL Router needs to connect to the cluster and have privileges to query the performance_schema, mysql_innodb_cluster_metadata and create a restricted, read-only account to be used by itself during normal operation.
Assuming MySQL Router is already installed, all we need to do is to bootstrap it with the metadata server, calling mysqlrouter with the following command line option from the system’s shell:
miguel@tecra:[~/work/testbase/mysql-router-8.0.11-linux-glibc2.12-x86-64bit]$ ./bin/mysqlrouter --bootstrap root@ic-1:3306 -d myrouter
Please enter MySQL password for root:

Bootstrapping MySQL Router instance at '/home/miguel/work/testbase/mysql-router-8.0.11-linux-glibc2.12-x86-64bit/myrouter'...
MySQL Router  has now been configured for the InnoDB cluster 'myCluster'.

The following connection information can be used to connect to the cluster.

Classic MySQL protocol connections to cluster 'myCluster':
- Read/Write Connections: localhost:6446
- Read/Only Connections: localhost:6447
X protocol connections to cluster 'myCluster':
- Read/Write Connections: localhost:64460
- Read/Only Connections: localhost:64470
MySQL Router connects to the InnoDB cluster, fetches its metadata and configures itself for use. It will configure itself to run from a self-contained directory, which allows you to deploy multiple instances of the router in the same host without root privileges. The generated configuration creates 4 TCP ports: one for read-write sessions (which redirect connections to the PRIMARY) and one for read-only sessions (which redirect connections to one of the SECONDARY instances, in a round-robin fashion, by default); one set for classic MySQL connections and another for the X protocol.
If your application opens a very high number of database sessions overloading the PRIMARY instance and additionally does not need to perform updates, you can limit them to use read-only sessions and offload the PRIMARY.
Once bootstrapped and configured, start MySQL Router (or setup a service for it to start automatically when the system boots):
$ myrouter/start.sh You can now connect a MySQL client to one of the incoming MySQL Router ports and see how the client gets transparently connected to one of the InnoDB cluster instances. To see which instance we are actually connected to, we simply query the ‘port’ and ‘hostname’ status variable.
$ ./bin/mysqlsh --uri root@localhost:6446
Creating a session to 'root@localhost:6446'
Enter password: ***
Fetching schema names for autocompletion... Press ^C to stop.
Your MySQL connection id is 92
Server version: 8.0.11 MySQL Community Server - GPL
No default schema selected; type \use  to set one.
MySQL Shell 8.0.11

Copyright (c) 2016, 2018, Oracle and/or its affiliates. All rights reserved.

Oracle is a registered trademark of Oracle Corporation and/or its
affiliates. Other names may be trademarks of their respective
owners.

Type '\help' or '\?' for help; '\quit' to exit.


mysql-js> \sql
Switching to SQL mode... Commands end with ;

mysql-sql> SELECT @@port;
+--------+
| @@port |
+--------+
|   3306 |
+--------+
1 row in set (0.0007 sec)

mysql-sql> SELECT @@hostname;
+------------+
| @@hostname |
+------------+
| ic-1       |
+------------+
1 row in set (0.0006 sec)

1 row in set (0.00 sec)
Here we connected to the read-write port (6446), so the Router connected us to the PRIMARY server, which is listening on port 3310. Now, try connecting to the read-only port (6447) and see what you get.
Checking Status of the InnoDB Cluster
To check the status of the InnoDB cluster at a later time, you can get a reference to the InnoDB cluster object by connecting to the cluster through the Router or directly to one of the instances. If you want to make changes to the cluster, you would need to connect to the read-write port of the Router.
$ ./bin/mysqlsh --uri root@localhost:6446
Creating a session to 'root@localhost:6446'
Enter password:
...

mysql-js> cluster = dba.getCluster()

mysql-js> cluster.status()
{
    "clusterName": "myCluster",
...
Putting the InnoDB Cluster to the Test
Next, we want to challenge the InnoDB cluster and test if the failover really works. We are going to kill the PRIMARY instance and see if one of the other instances takes over automatically.
Note: We have installed the MySQL Service on Debian platforms. In order to simulate the instance going offline we’ve stopped the service: sudo service mysql stop
After that, we again check (from our test session to the MySQL Router) which instance we are now connected to. The first SELECT fails since the connection to the original PRIMARY was lost. MySQL Shell automatically reconnects for us and we simply execute the command again.
mysql-sql> SELECT @@hostname;
ERROR: 2013 (HY000): Lost connection to MySQL server during query
The global session got disconnected..
Attempting to reconnect to 'mysql://root@localhost:6446'..
The global session was successfully reconnected.
mysql-sql> SELECT @@hostname;
+------------+
| @@hostname |
+------------+
| ic-2       |
+------------+
1 row in set (0.0007 sec)

mysql-sql> \js
Switching to JavaScript mode...
mysql-js> var cluster = dba.getCluster()
mysql-js> cluster.status()
{
    "clusterName": "myCluster",
    "defaultReplicaSet": {
        "name": "default",
        "primary": "ic-2:3306",
        "ssl": "REQUIRED",
        "status": "OK_NO_TOLERANCE",
        "statusText": "Cluster is NOT tolerant to any failures. 1 member is not active",
        "topology": {
            "ic-1:3306": {
                "address": "ic-1:3306",
                "mode": "R/O",
                "readReplicas": {},
                "role": "HA",
                "status": "(MISSING)"
            },
            "ic-2:3306": {
                "address": "ic-2:3306",
                "mode": "R/W",
                "readReplicas": {},
                "role": "HA",
                "status": "ONLINE"
            },
            "ic-3:3306": {
                "address": "ic-3:3306",
                "mode": "R/O",
                "readReplicas": {},
                "role": "HA",
                "status": "ONLINE"
            }
        }
    },
    "groupInformationSourceMember": "mysql://root@localhost:6446"
}
This shows that the InnoDB cluster provided us with automatic failover, that MySQL Router has automatically reconnected us to the new PRIMARY instance (‘ic-2’), and that we have high availability.
Now let’s get ‘ic-1:3306’ back online and watch it rejoin the cluster automatically!
mysql-js> cluster.status()
{
    "clusterName": "myCluster",
    "defaultReplicaSet": {
        "name": "default",
        "primary": "ic-2:3306",
        "ssl": "REQUIRED",
        "status": "OK",
        "statusText": "Cluster is ONLINE and can tolerate up to ONE failure.",
        "topology": {
            "ic-1:3306": {
                "address": "ic-1:3306",
                "mode": "R/O",
                "readReplicas": {},
                "role": "HA",
                "status": "ONLINE"
            },
            "ic-2:3306": {
                "address": "ic-2:3306",
                "mode": "R/W",
                "readReplicas": {},
                "role": "HA",
                "status": "ONLINE"
            },
            "ic-3:3306": {
                "address": "ic-3:3306",
                "mode": "R/O",
                "readReplicas": {},
                "role": "HA",
                "status": "ONLINE"
            }
        }
    },
    "groupInformationSourceMember": "mysql://root@localhost:6446"
}
With this, you should be able to get started with MySQL InnoDB clusters and play with High Availability with minimal effort.
credit: https://dev.mysql.com/blog-archive/mysql-innodb-cluster-8-0-a-hands-on-tutorial/