We are using Aurora PostgreSQL RDS clusters as our Database for our Applications. We were using a 9.x version of Aurora PostgreSQL RDS clusters for some of our services. We have successfully and Seamlessly upgraded our clusters from 9.x to 12.x version with Minimal downtime. In this blog post I will try to explain how we have achieved this goal.
There are different ways in which you can upgrade your DB Cluster Version
- In-Place Upgrade: — In-Place Upgrade time totally depends on the size of the database, if your database size is small you can use In-Place Upgrade. Remember one thing that during In-Place Upgrade you can not use your database cluster, your application can not connect to your database
- Use some third party tool: — We have used Bucardo and I will explain this in the blog
- AWS Database Migration Service
One of the major disadvantages of the 9.x version is that it doesn’t support Logical Replication and because of this you can not create replication slots and migrate your data, so to solve this problem we have used the Bucardo tool to migrate our data from source to target cluster. Bucardo uses a Trigger Based Approach to capture the changes on the source database and then migrates it to the target database. There are some limitations of bucardo as well, I will also discuss this in our blog and how we have used an alternate approach to migrate the data that also I will explain.
We have upgraded around 20 databases in single downtime window and we have used Bucardo for 90% of our databases, for 10% of special cases we have used either pg_dump and pg_restore because of small database size or we have used AWS Database Migration Service + Upsert Query (query to perform insert + update together based on conflict of primary key).
Let me tell you some of the characteristics across our databases for different tables:
- Records not too frequently updated/inserted
- Table is Update heavy (more updates then inserts)
- Table with the huge size (in Tb’s) and records inserted/modified
- Tables can have LOB columns
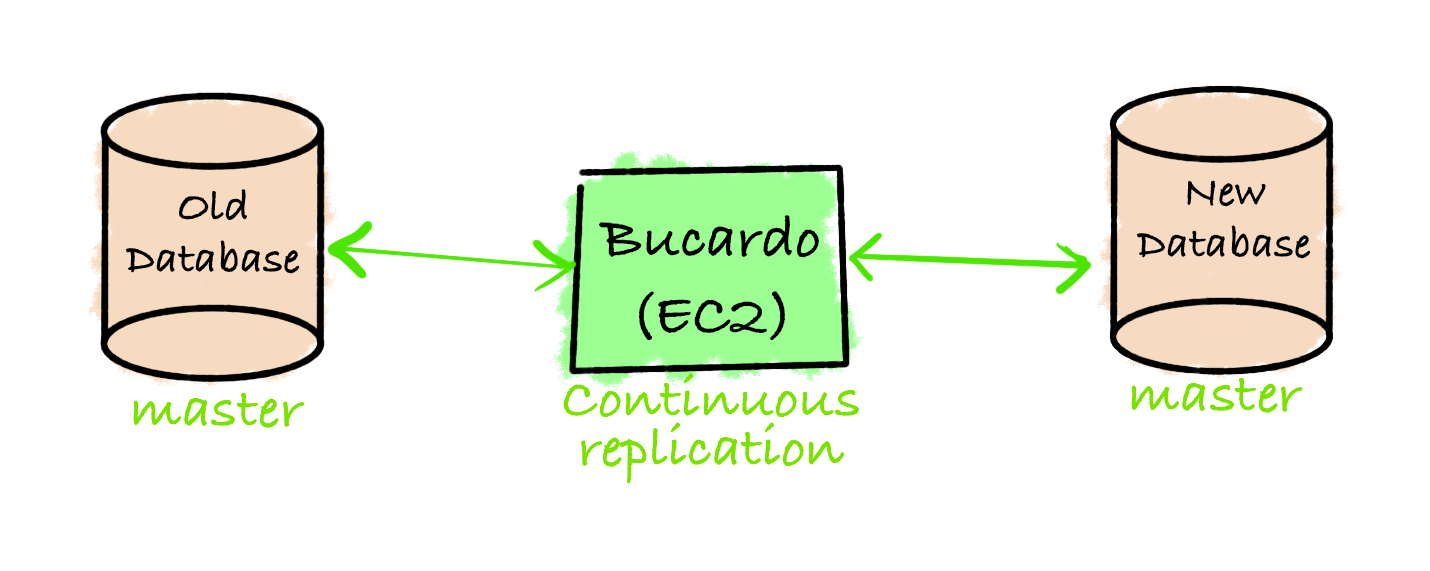
Architecture Diagram
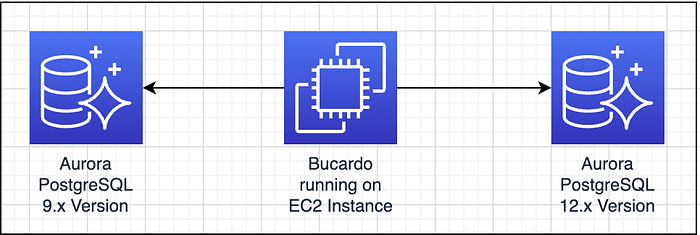
In the above diagram you can see that we have a source database cluster with a 9.x version where the application is reading / writing the data. We have created a new cluster with our target version as 12.x and we have migrated data from source cluster to target cluster using Bucaro.
The Bucardo process runs on an EC2 Instance, which is responsible for reading the data from the source and migrating it into the target cluster.
Prerequisite
- Source Cluster
- Target Cluster with new Version
- All the tables must have Primary Key
- Schema is already present in Target cluster
- Ubuntu OS EC2 Instances for Bucardo
We collected some statistics to plan the Number of EC2 required and we have divided 1 database into multiple Bucardo Pipelines, responsible for migrating the tables based on the statistics we collected.
Let’s Get Started
Get the total size of the database
select datname, pg_size_pretty(pg_database_size(datname))
from pg_database order by pg_database_size(datname) desc limit 10;
Based on the output of the above query if database size is in a few MB’s We have used pg_dump and pg_restore to migrate the tables during the downtime window. We had written bash scripts to take a dump and restore so that it saves time and chances of human error.
This approach doesn’t require table schema to be present in the target.
Get the size of each tables
SELECT table_name,
pg_size_pretty(pg_relation_size(quote_ident(table_name))),
FROM
information_schema.tables
WHERE
table_schema = 'public'
ORDER BY
pg_total_relation_size(quote_ident(table_name)) DESC;
- Example Output
table_name             | pg_size_pretty |
----------------------------------------+---------------------------
table1                 | 476  GB        |
table2                 | 28   GB        |
table3                 | 8551 MB        |
table4                 | 8649 MB        |
table5                 | 1627 MB        |
table6                 | 1207 MB        |
Now assume that “table2” and “table4” are update heavy tables and based on the above output we have decided to create 4 EC2 Instances and we have used “c5.2xlarge” instance type
- EC2 Instance1 — Bucardo Pipeline only for table1
- EC2 Instance2 — Bucardo Pipeline only for table2
- EC2 Instance3 — Bucardo Pipeline for table3, table5 and table6
- EC2 Instance4 — Bucardo Pipeline only for table4
Note: — The reason for dividing it into 4 EC2 Instances is that we are aware that the “table2” and “table4” are update heavy tables and “table1” has ~500 Gb of size and if something goes wrong during the migration it will not affect the migration of other tables.
Before starting the bucardo process we have updated the “shared_buffers” parameter value because we have observed that during the migration of update heavy tables or tables with a large size the default value doesn’t work and it throws an error during the migration.
In a similar approach we have planned Migration of the other tables.
Now let’s talk about how we have planned the migration of tables which has millions of records. We have used “AWS Database Migration Service” to migrate the data and to capture “inserts/updates” from the source database. We have used a column which has a timestamp datatype along with an id column and we have used UpSert Query to do the changes in the target database.
It is very important to plan how many DMS Tasks will be required, it totally depends on the number of records in the table. In our database we have ~705 million records and based on this number we created 5 DMS Tasks to migrate this table. Each Task has “49 parallel” threads. We have used features provided by DMS such as “Parallel-load” and “filters” to divide tables into multiple DMS tasks and migrate the records in parallel.
Note:- It is recommended to have a larger instance type for source and target clusters, so that during migration our database doesn’t get affected because of the DMS task. Use of the above feature puts load on the source and target database clusters and it is recommended to have a large number of sessions.
If your table contains LOB columns then Full Load Migration can take longer time, so we have identified the size of LOB column and while creating DMS Tasks we set ‘InlineLobMaxSize’: <max_lenght_of_lob_column> , to get this value run the following query
select max((octet_length(<column_name>::varcher))/(1024.0)) as "Size in KB" from <table_name>;
We have an “id” column in our table and based on the id column we have divided table into 5 DMS Tasks. Now, we know that each DMS Task can have maximum “49 parallel threads” so, 49 * 5 = 245 threads. We have ~705 million records, so “705 million/245 = 2877551” per thread. We have migrated ~2.8 million records per thread using AWS DMS. In other words in DMS Task — 1, thread — 1 migrate records till “id <= 2877551” for the DMS Task — 1, thread — 2 migrate records “id > 2877551 and id <= 5755102” (2877551 + 2877551) for DMS Task — 1, thread — 3 migrate records “id > 5755102 and id < 8632653” (5755102 + 2877551) and so on. In DMS terms it is called a boundary. To get the value of all 245 boundaries use following python code
x = 2877551
for i in range(245):
    print(x)
    x = x+2877551
If you want to understand the calculations of these boundaries please go through this blog. In this I have tried to explain in detail how to divide the table and how to identify boundaries.Upgrade/Migrate Aurora PostgreSQL with Minimal Downtimeharshvijaythakkar.medium.com
While Configuring DMS Tasks remember the following points:
- Migration type — Migrate existing data
- Target table preparation mode — Do nothing
- Include LOB columns in replication — Full LOB mode
- Enable CloudWatch logs (Optional)
- Maximum number of tables to load in parallel — 49
- Commit rate during full load — 50000
- Since I have 5 Tasks:
a. For the Task — 1 use filter-operator “less than equal to” and write <49th id>
b. For the Task — 2 use filter-operator “between” and start value will be <49th id> + 1 and end value will be <98th id>
c. For the Task — 3 use filter-operator “between” and start value will be <98th id> + 1 and end value will be <147th id>
d. For the Task — 4 use filter-operator “between” and start value will be <147th id> + 1 and end value will be <196th id>
e. For the Task — 5 use filter-operator “between” and start value will be <196th id> + 1 and end value will be <245th id> - “InlineLobMaxSize”: <max_lenght_of_lob_column> (Parameter setting is available in JSON mode only and only available if you have enabled full LOB mode)
- Use Parallel-load feature of DMS to load data in parallel
- Source and Target database cluster size should be large
You can refer above blog to understand how to write Task definitions baed on the above calculations, depending on the number of Tasks your settings will be different for each Tasks.
Now, once we have prepared the DMS Tasks and stated it we need to note down the “Start Time of the DMS Task” which will help us to capture insert/updates in the source database.
For Example we started DMS Tasks at “8 PM IST” on the day of downtime and let’s say above 5 Tasks takes 4 Hrs to complete (time after doing test in lower environment) then whatever transactions happens after starting DMS Tasks to capture those transactions we used DMS Start Time.
Capture Delta Data from Source and apply it on Target database in Downtime Window
During the downtime we run a few queries to capture data from the source and apply it to the target.
- Run the following query on source database to add new/updated transactions into new table
create table table_delta as select * from table where modified_on >= [DMS start time - 05:30];
We have used DMS start time — 05:30 because we noted DMS task start time in IST timezone and in our tables the values are stored in UTC timezone
- Export delta table data from source
# Export using pg_dump
pg_dump -h $SOURCE_HOSTNAME -U $USERNAME -d $DATABASE -t table_delta > table_delta.sql

# Export using CSV
psql -h $SOURCE_HOSTNAME -U $USERNAME $DATABASE -c "\copy table_delta to '~/table_delta.csv' DELIMITER ',' CSV HEADER;"
You can use any one query and run it on EC2 Instance to get the data from source and save data on EC2
- Import delta table data into target
# Import command if you have exported using pg_dump
psql -h $TARGET_HOSTNAME -U $USERNAME -d $DATABASE < table_delta.sql
Run above command on EC2
# Import commands if you have exported using CSV
1. Create Table in target database cluster (Run this on database to create empty table)
somedb => create table table_delta as select * from <table_name> where 1=2;

2. Run Import command (Run this on EC2)
psql -h $TARGET_HOSTNAME -U $USERNAME $DATABASE -c "\copy table_delta from '~/table_delta.csv' DELIMITER ',' CSV HEADER;"
In above methods we are storing exported data (delta data) from source table into a temp table on target database.
- Run UpSert query
psql -h $TARGET_HOSTNAME -U $USERNAME $DATABASE << EOF
insert into <table_name>
select * from table_delta
on conflict(<primary_key_column>)
do
update set col1=EXCLUDED.col1
, col2=EXCLUDED.col2
, col3=EXCLUDED.col3
, col4=EXCLUDED.col4
, col5=EXCLUDED.col5
, col6=EXCLUDED.col6
, col7=EXCLUDED.col7;
EOF
Using above command we are selecting records from temp table (table_delta) inserting it into actual table and on conflict of primary_key we are updating records in actual table.
Note:- While Preparing UpSert Query don’t include “primary_key_column” in update statement.
So, In this way after learning from multiple failures in lower environments we have Seamlessly and Successfully Completed Major Version Upgrade of Aurora PostgreSQL RDS clusters from 9.x to 12.x version.
credit: https://awstip.com/seamless-major-version-upgrade-of-aurora-postgresql-rds-6061efd00d3a